I’m not a developer. I majored in German and History with a focus on Linguistics and the Philosophy of Language. I never learned to code. I’m just an advanced user of software, one of which is Marketo.
Understanding the Marketo API is usually not part of the skillset of a marketer. Even not necessarily that of a marketing operations person. But from my experience, it is extremely beneficial to know what you’re talking about when you have a role in an integration project. No Marketo is an island – the deeper you get into it, the more you understand it’s part of your tech stack and you have to integrate it with everything. And integration means API.
So what I’m trying to do here is to illustrate every step of the way you need to go for your first interaction with the Marketo database via API. As counterpart I use Postman, which is an API testing tool, and it’s free and it’s great. So let’s go!
Phase 1: Set up Marketo
You’ll need administrative privileges in your Marketo instance to create the necessary API credentials.
Create a role: Go to Admin -> Users & Roles -> Roles. Create a new role and grant it the necessary API access permissions.

For this exercise we ignore the 35 sub-items in the “Access API” tree. They are all important and interesting, and if you create a role for any external partner, you should know what you’re doing. But this is for testing and we only reveal the secrets of this API to ourselves, so let’s not worry.
Create a user: Go to Users -> Invite New User
The email address will later on allow you to see who took a specific action in Marketo. It’s not important for the connection to Postman and it doesn’t need to exist. Just make it up.
I like to give my API users the first name “API”, so they are listed nicely in alphabetical order in your list of users.
Assign the role you just created to this new users, and check the box at “API Only”:
This role grants access only to the API and not the Marketo UI. And because it’s an API only role, no email invitation is sent to that user.
Create a LaunchPoint: Go to Admin -> Integration -> LaunchPoint.
Create a new LaunchPoint. Give it a name, select “Custom” under Service and select the API Only User you just created:
Now the new Launchpoint appears in your list of installed services. Click the “View Details” link and copy Client ID and Client Secret. Store these securely. You’ll need them for Postman.
Phase 2: Set up Postman
Go to https://www.postman.com/: You can either install a local app on your computer or use the web interface. I find them equally useable.
Create an account. It’s free.
Create a Postman Environment:
In Postman, click Environment in the top left), hit “New” and “Environment”. The Environment saves your access data to Marketo and you will need to apply it to your API calls. If you have more than one Marketo – or any other endpoint you want to create calls to – you can manage them here.
You don’t need to necessarily separate your Environments from your API Call Collections, but I find it practical and I encourage you to do it.
Name your new Environment something like “YourCompany Marketo” or “Marketo_MunchkinID”. We will get back to Munchkin ID in a second, as you need it to create the Environment. But either way: You can change the name of your Environment at any time.
Now add the following variables and values to your environment:
client_id: Paste the Client ID from your LaunchPoint.
client_secret: Paste the Client Secret from your LaunchPoint.
base_url: This is the URL of your Marketo instance’s endpoint. It is built like this:https://[munchkinId].mktorest.com
You find the Munchkin ID of your instance in various places in Marketo. Let’s get it from Admin -> Integration -> Munchkin here.
bearer_token – leave the values open here. More on the Bearer Token later. Eventually, it will look something like this:
You see that I have obfuscated the data. Take care of these and don’t share them lightly with the world. This information alone give an API the rights to wreak havoc onto your Marketo instance and you might not want that.
Phase 3: Make calls to the API
Now it’s time to make your first call to Marketo: Get an Access Token. Client ID and Secret are not enough to call the API, you also need a token. This token – also called Bearer Token – is valid for 10 minutes, so you’ll need to refresh it periodically.
Create a new Collection. A Collection is a folder for API calls or as Postman calls them: requests.
Go to Collections, hit “New”, then “Collection” and name your collection “Marketo”. Within that collection “Marketo” you might later on create more folders to file your various requests by endpoint. Looks like that for me:
I don’t want to go to deep into the various endpoints here, but just know that “Creating a person” and “Creating a form” needs to be done with different endpoints.
Hit the three little dots next to your collection and select “Add request”. Name this request “Get Bearer” or “Get Token” or “Auth” – this is all the same thing and means: We want to GET a token from Marketo to authorize our next request.
Note that this request is of the type “GET”. We will also look at “POST” later, but for now it should suffice to say, that “GET” gets us something from Marketo and POST posts something into Marketo. Who would have thunk? (is that even a word?)
Now it’s time to take a look at Marketo Developer Documents, which you will need to be friends with. This is hardcore developer stuff, but you need at least a superficial understanding of what’s in here and where to look at if you need exact definitions of how things work.
https://experienceleague.adobe.com/en/docs/marketo-developer/marketo/rest/authentication
Here you’ll find a lot I’ve already talked about. Important for now is how exactly that authentication call needs to look:
{{base_url}}/identity/oauth/token?grant_type=client_credentials&client_id={{client_id}}&client_secret={{client_secret}}

base_url, client_id and client_secret will get the variables we have defined in our Environment. You now will need to select that Environment (upper right in Postman) to apply these values.
If you have done everything right until here, hit “Send” and ideally you get a result like this:
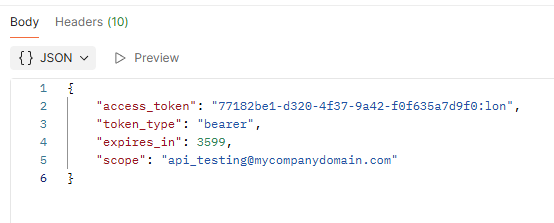
The status code “200 OK” also indicates that your call was successful and now you a token to work with. The value in “access_token” is saved now in the variable you have assigned in your Collection which was called “bearer_token”.
Great! Channels of communication are now open and we do something in Marketo. Roughly speaking, everything we can do from the Marketo UI we can also do from the Marketo API. Let’s create a new person, as this call is also a necessary pre-requisite for all sorts of other things. Any API that sends data to Marketo will very likely also create or update people.
Create a person
Right-click your Marketo folder, and select “Add request”. This time we’re using the POST method, as we want to post data into the Marketo lead database. The request is:
POST {{base_url}}/rest/v1/leads.json
leads.json is the endpoint to create or update a person.
In “Authorization” we now need to tell Postman which Auth Type we’re using and what the variable is. Select Auth Type = Bearer Token and copy the variable we defined in Environment into the Token field:

Now to the Body, and again, see for reference the Marketo developer docs.
{
  "action":"createOrUpdate",
  "lookupField":"email",
  "input": [
    {
      "email": "michael.florin@martech-magic.com",
      "firstName": "Michael",
      "lastName": "Florin"
    }
  ]
}
Okay, what are we looking at here?
“action”:”createOrUpdate” – this tells the request to create a person if it doesn’t exist yet or to update it should it exist. Same behavior you know from Marketo Form Submits.
“lookupField”:”email” – the lookup field decides what “exists” means. In this case it’s email, which is also the default value, but it can be any Marketo field that serves as a unique identifier in the database. For instance, Marketo ID (API name: id) or any other person ID you might be using like a Salesforce or Dynamics ID.
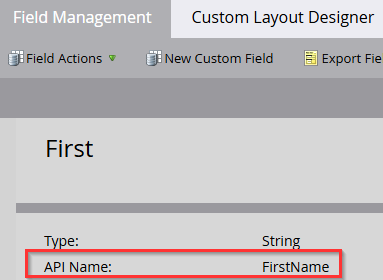
And finally in “input” we post an array of values we want to insert. “email”, “firstname” and “lastname” are the API names of these fields. You see these API names either in Admin -> Database Management -> Field Management in a field’s details or in your “Export Field Names” or “Export All Objects” files.
After we hit “Send” we ideally see this result:
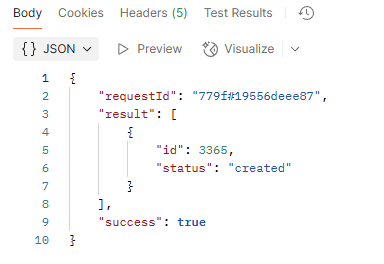
“id” is the new Person ID that Marketo has assigned this person record, and the status is “created”. If you send the same call again, the result will say
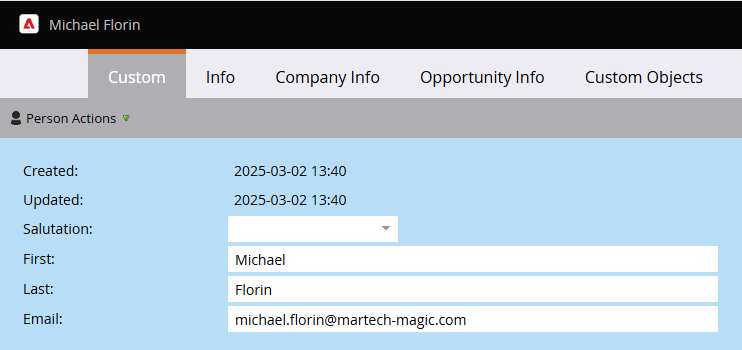
"status": "updated"That’s it, folks. You created your first person via the API. Let’s take a look into Marketo to see if it really worked. Search for the new record in the database by email address or go to any lead detail view and insert the ID you just go from the response in the URL:
https://app-lon08.marketo.com/leadDatabase/loadLeadDetail?leadId=3365&accessZoneId=1And here we go:
Key Considerations
- Marketo Documentation: The Marketo Developer documentation is your best friend: https://developers.marketo.com/rest-api/. It contains all the details about API endpoints, request parameters, and response formats.
- Rate Limits: Be mindful of Marketo’s API rate limits. Exceeding them can result in your requests being throttled.
- Error Handling: The API will return error codes if something goes wrong. Pay attention to these codes to troubleshoot issues.
- Token Refreshing: Access tokens expire. You’ll need to repeat the token retrieval process periodically. You can automate this within Postman.
- Testing: Start with test data and a test environment in Marketo before making changes in your production environment.
This guide should help you get started with the Marketo API using Postman, even without extensive coding experience. Remember to refer to the official Marketo documentation for the most up-to-date and comprehensive information. Good luck!